
Congrats! You did it. You’re ready to make your very own project. This is what it’s all about. This is what you’ve been learning for. To create. To make. To build. To turn an idea into a real live app that people will use. Something that will live forever in perpetuity on the internet.
Oh no! Something that will live on forever on the internet! This is terrifying. There are no tests. No instructions. No starter code.
This project will be full of speed bumps, road blocks, and dead ends. This is great because as a developer your job is to problem solve. When the problem no longer exists, the job is done. The more comfortable you are getting stuck and hitting walls, the more you’ll learn and the better developer you’ll be when it’s all said and done.
Here are five tips to help start and finishing your coding project.
Take the quiz: What Coding Course Is Right For Me?
1. Brainstorming an Idea
What in the world should I build? Everything’s already been built!

Coming up with an idea is often the first big challenge. Maybe you have a great idea you’ve been itching to build, but if you don’t it’s totally okay. If you’re struggling to come up with an idea, consider these two approaches.
The first approach is to think about pain points in your own personal life. Are there activities that you do and think “this is a terrible way of doing X” or “I really wish we had a tool to do Y?” This problem-centered approach is a great way of encouraging your brain to focus on solving a specific problem rather than coming up with a great project idea. Many great tech projects all started as a simple solution to a problem.
“I wish I could meet more people at my school” – Facebook
“What do you do when all the hotels are booked?” – AirBnB
“How can we make use of this extra office space we have?” – WeWork
What are some examples in your own life? Do you check 15 news sites when you wake up? Build a news aggregator. Is there an online form you have to fill out everyday? Build some automation tool to do it for you. Do baby animals make you smile? Build a random puppy gif generator. Make it work for you.
The second approach for brainstorming ideas is technology based. Is there a particular tech you want to work with? If so, you can let that lead your brainstorming session. Say, for example, you want to learn how to send text messages from a web app. That’s a great start. You can explore what libraries and APIs are out there. Let’s say you Google “send text message from web app” and discover Twilio. Perfect! Now you have a goal of learning the Twilio API, and all you need now is a use-case to build around it. It could be as simple as a todo list that texts reminders of incomplete tasks, a blog app that texts the author when they get a new comment, or a random puppy gif texter.
2. Scoping Core Features

Okay – You have a brilliant idea! Guess what? Odds are it’s way too complex. The goal for the project is to come up with a Minimum Viable Product (MVP). What is the bare bones functionality that is essential to making this project work? There is a design principle in programming called KISS. Simplicity is our friend. Let’s walk through an example.
Take our text message blog app idea. We want an app that has the ability to create blog posts and send a text if someone comments on your post. It would also be cool if users could follow a post and also receive a text when a comment occurs. Even better, maybe we could have the author reply to the comment by texting from his or her phone.
Beware of the phrase “It would also be cool if.” Focus on just the core feature(s). In our case, it is just the first sentence in the description above: “We want an app that has the ability to create blog posts and send a text if someone comments on your post.” This is plenty to work on for now. Everything else is extra.
Just because we are scaling back now doesn’t mean the other stuff was a bad idea. It might be pretty cool if you can work it in after you get your MVP. Hang on to any periphery functionality; it might be an awesome feature in the future.
Step 3: Managing Your Project
After you’ve zeroed in on an idea, the next step is to do some prep work to help navigate this journey. First, you want to set some timeline expectations for yourself. This will help keep you on track (as we saw in the previous section, it is easy to go down coding rabbit holes). Estimating timing is one of the harder things to do in software development, so it’s a good habit to practice. Check out this fantastic Dropbox post on the topic. https://blogs.dropbox.com/tech/2015/10/what-do-you-mean-you-need-more-time/
Related to time management, it’s a good idea to practice using project management tools. I like to use Trello with this set up.
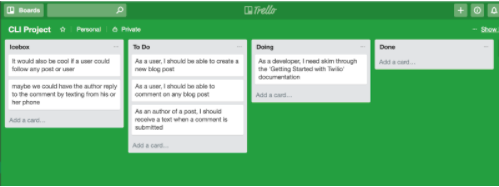
Notice the four columns: Icebox, To Do, Doing, Done.
Icebox is my favorite column. Remember when we scoped the idea, but we said we would hang on to those awesome periphery features? They go into the Icebox. It keeps you from getting distracted with all your great ideas to expand the app. If you think of something that does not have to do with the accomplishing the core functionality, throw it “on ice.” We can always revisit once we finish the core features.
The other three columns are more straightforward. All of your tasks that need to get done go in the To Do column. As you work on a task, drag it into the Doing column. And after you complete it, move it into Done. This is a visual reminder of how the project is coming along, and it will help you manage your time. If you’re interested in taking a deeper dive into crafting tasks, assigning difficulty rankings, and setting deadlines, take a look at these additional resources:
https://blog.hubstaff.com/kanban-with-trello/
https://zapier.com/learn/project-management/kanban-board/#basics
4. Use Your Resources
Now you’re all set up and ready to go. It may feel like you’re on an island since you alone are responsible for the code. But remember there is a huge developer community out there to help.
If you’re working on your first Flatiron project, my first go-to resource would be Avi’s walkthrough on how to get started building a CLI gem. In general, there are a wealth of great videos at http://instruction.learn.co/student/video_lectures. I’d highly recommend bookmarking that page.
Google, as you probably know by now, is a great resource. Some developer somewhere, sometime in the past has had the same question, and Google is there to help you find it. Googling and reading StackOverflow is a skill in and of itself. Use the project as a good excuse to practice those skills.
Rubber duck through your issue. Grab a friend and talk through your code. Even if they do not know how to code themselves, it will be helpful to hear yourself articulate what’s going on. If you’re going through the Flatiron curriculum, grab another student on Slack or sign up for a One-on-One Portfolio Project Support session. We love being rubber ducks!
Beyond just being rubber ducks, we are here to help. There is a study group specifically designed to help answer questions about your first project. Study groups are a great way to learn collaboratively with fellow students working on similar issues. Learn more about Study Groups in the Help Center. If you find you need more specialized attention, the One-on-One Portfolio Project Support is there for you. This is not meant to fully solve your problem; however, it is a great way to discuss your issue and provide you with tips and other resources to get you pointed in the right direction.
Last but most definitely not least, your fellow students are an extremely valuable resource. Remember, you’re not alone. There is a whole community of people going through the same trials and triumphs. Get involved in Slack. Check to see if there is a channel directly relating to your topic or issue. And while you’re at it, pay it forward and celebrate those victories together.
5. Have Fun
The most important tip — enjoy the process. You will have frustrating moments and blissful breakthroughs. Relish in it. The goal is to learn, not build the next Facebook. Whatever you build is going to be an incredible learning experience. Play around with it and have some fun. We can’t wait to see what you come up with!